
For a church fundraiser in June I auctioned off the service of making one custom birthday cake. The winner of the cake happened to be my across-the-street neighbor, and they "collected" on their winnings this weekend with their 9-yr-old son's birthday. At first (a month ago) I was told he wanted a football cake. But then a few days later he'd changed his mind, and wanted his party to be all about Beyblades. Well, I had NEVER heard of that! So I figured I'd better learn pretty quick!
Not being my own child's birthday cake, I wasn't as excited about this project as I usually am, but once I got into it, it was still a lot of fun to make. I made two 10" rounds (chocolate cake) and split them with chocolate frosting between each layer. FYI, one full cake mix fits perfectly into a 10" round. After the crumb coat I carved the "fins" to make it look a little more like the shape of a Beyblade (which is basically a fancy top). The thin parts weren't very sturdy but after another coat of frosting, and holding them steady with toothpicks in the fridge overnight, they ended up being okay with the weight of the fondant.
I used a couple of products for the first time with this cake: food color spray (like edible spraypaint; widely available) and edible markers. Both worked great! I covered the top first in white marshmallow fondant and then sprayed it blue. I also covered the sides (in angular strips) in white fondant and sprayed the sides blue, too. I used blue and red fondant for the accents -- my friend Danika had just made a Lego cake for her son and she brought her leftover, brightly-colored fondant for me to use and it was perfect for this!
 For the red letters & design, I cut the shapes out of the red fondant and then let them dry out (laying on a Silpat mat so they wouldn't stick) for a few hours so that I could transfer them to the cake when they were more stiff not so pliable, so that they wouldn't lose their shape when transferred.
I drew this "Galaxy Pegasis" (Zach's favorite Beyblade) with the edible markers, which I bought at Michael's. I had cut this thick hexagon (using a paper template) from the white fondant, sprayed it lightly with the blue spray, and let it "dry" for a several hours before attempting to draw on it with the markers. The surface had firmed up some by then but I still had to be very careful not to apply too much pressure as it was still a bit squishy.
 I covered the top first in white marshmallow fondant and then sprayed it blue. I also covered the sides (in angular strips) in white fondant and sprayed the sides blue, too. I used blue and red fondant for the accents -- my friend Danika had just made a Lego cake for her son and she brought her leftover, brightly-colored fondant for me to use and it was perfect for this!
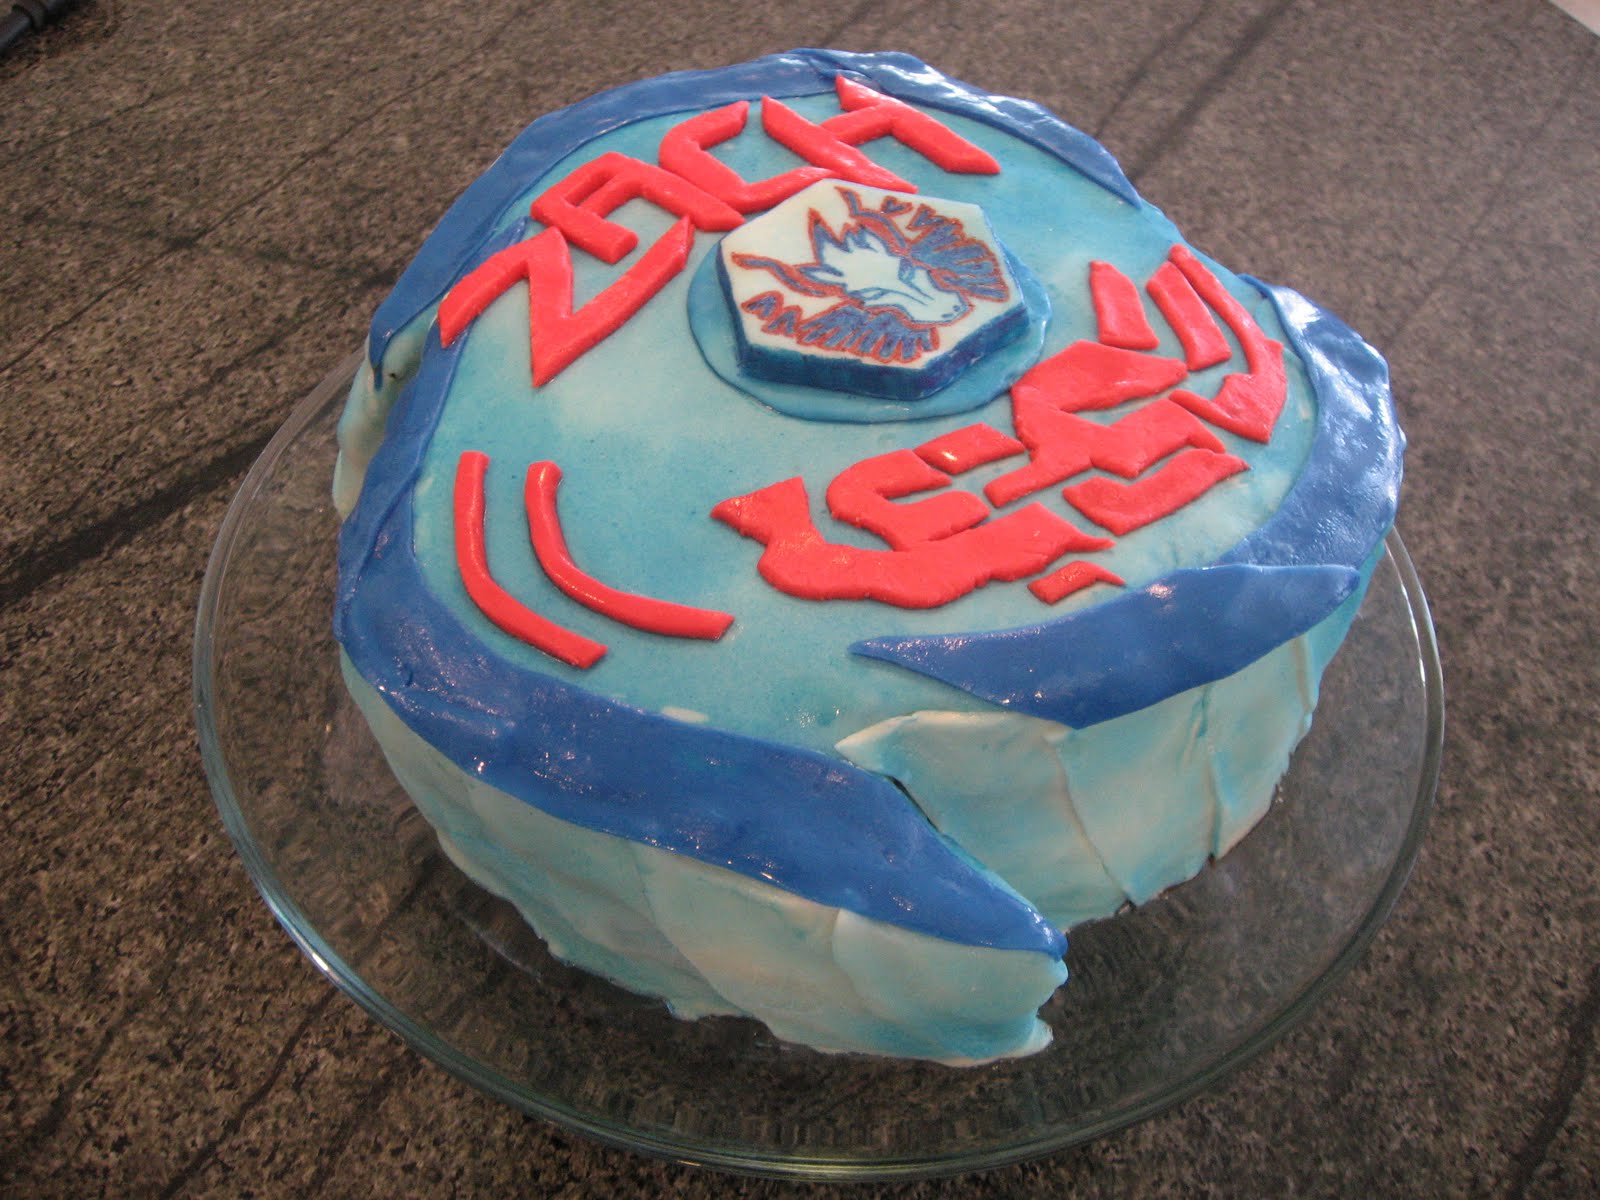 For the red letters & design, I cut the shapes out of the red fondant and then let them dry out (laying on a Silpat mat so they wouldn't stick) for a few hours so that I could transfer them to the cake when they were more stiff not so pliable, so that they wouldn't lose their shape when transferred.
I drew this "Galaxy Pegasis" (Zach's favorite Beyblade) with the edible markers, which I bought at Michael's. I had cut this thick hexagon (using a paper template) from the white fondant, sprayed it lightly with the blue spray, and let it "dry" for a several hours before attempting to draw on it with the markers. The surface had firmed up some by then but I still had to be very careful not to apply too much pressure as it was still a bit squishy.

Here is what an actual Galaxy Pegasis Beyblade looks like; I printed this out as a guide and I also had borrowed the birthday boy's toy for reference. (Don't be too critical; I know it doesn't look much like it but I do think the Pegasis turned out pretty well.)
 It was a fun challenge, and I'm excited to now have colored spray and food markers added to my repertoire of cake-making tools.
P.S. A couple of fondant tips: when you're ready to roll it out, sprinkle plenty of powdered sugar onto your counter and rolling pin. If it's still too sticky, knead more powdered sugar into it. This is for marshmallow fondant; it's been so long since I've used "regular" fondant that I don't recall whether it gets too sticky or not. Also, keep a cup of water with a small paintbrush handy (like a child's watercolor paintbrush). Brush water onto the back of pieces of fondant that you're going to stick on to the cake. Two layers of fondant with water between them will stick together permanently! Also, use the water to brush off any residual powdered sugar on the exposed surface. Or just brush some water on there to make it more shiny!
P.P.S. I still don't know much about Beyblades but FYI, they spell it "Pegasis," and not "Pegasus," as is the traditional winged-horse spelling.


3 comments:
It is awesome! I'm sure Zach loved it!!!! Way to go!
It came out great! And you're welcome for the colored fondant - glad it was helpful!
Very impressive! I do like that spray. I used red once to make a spider man cake.
Post a Comment